 To access diagnostic programs, start at the Operation,
Advanced, Diagnostics menu.
To access diagnostic programs, start at the Operation,
Advanced, Diagnostics menu.BARR/RJE has several built-in diagnostic tools. Some diagnostic programs help you trouble shoot communications problems or diagnose other problems. Others help you provide Barr Technical Support with information to diagnose your problem.
To access diagnostic programs, start at the Operation,
Advanced, Diagnostics menu.
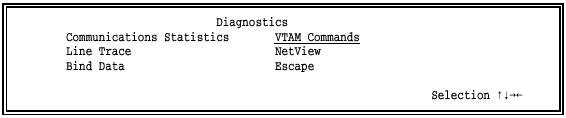
Standard Diagnostics – The Diagnostics menu for BARR/RJE looks like this:

Statistics
Display product options and buffer statistics. (See section 23.1.)
Link Diagnostics
Access diagnostics for the communications link, including Communications Statistics, Line Trace, Bind Data, VTAM Commands, and NetView. (See sections 23.2, 23.3, 23.4, 23.5, 23.6, and 23.7).
Memory Dump
Provide information for Barr Technical Support to diagnose unusual communications problems. (See section 23.8.)
Hardware Queries
Display information about the Barr adapters installed in your PC. (See section 23.9.)
Escape
Exit diagnostics.
Software Option Diagnostics – If you purchased software options (such as PRINT/TWINAX or BARR/PRINT for LAT) that allow you to communicate with more than one host, other options might display on the Diagnostics menu. For example, if you purchase PRINT/TWINAX, the option Twinax Diagnostics allows you to access diagnostics for PRINT/TWINAX as shown on the following screen.

You can display statistics about PC conventional and extended memory buffers.
To access the buffer statistics, start at the Diagnostics menu.
Select Statistics.
Product options and buffer statistics display. Section 23.3 describes buffer statistics and other statistics.

Press ESC to return to the Diagnostics menu.

To access link diagnostics, start at the Diagnostics menu.

Select Link Diagnostics.

Select the type of link diagnostics to view.
Communications Statistics
Provides statistics about communications activity since the BARR/RJE program started. These statistics help you evaluate the communications line’s reliability and use. (See section 23.3.)
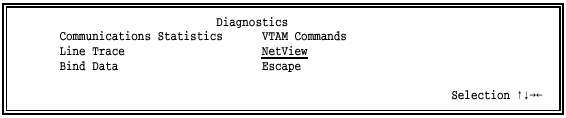
Line Trace
Provides information for Barr Technical Support to diagnose unusual communications problems. (See section 23.4.)
Bind Data
In SNA communications, bind data defines the operational rules for each party on the session. Use this option to view the bind data for a communications session. (See section 23.5.)
VTAM Commands
Send a VTAM command from any LU. Often used to verify that VTAM is operating. (See section 23.6.)
NetView
Provides information about SNA network operation and performance. If your host computer supports NetView, you can set BARR/RJE to use it. This option displays only if you enable NetView Alerts in BARR/RJE under Tuning and Global Options, Modem and Line Control. (See section 23.7.)
You can view statistics for the SDLC, 802.2, Coax, and X.25 connections.
To access Communications Statistics, start at the Link Diagnostics, Diagnostics screen.

Select Communications Statistics.

A time stamp on the first Communications Statistics screen indicates when the software began recording statistics. The time stamp appears after the label Statistics since on the bottom-left side of the screen. Statistics get refreshed when the program starts or when you use the reset command on the bottom of the screen to reset the statistics.
The second column contains the same type of information as the Statistics screen in section 23.1. The statistics provided depend on your connection type.
To navigate through the Communications Statistics screens, use these keys: N, R, or Any key.
If you have an SDLC connection, you can view a series of three screens.
lines read
Total number of data lines the Send command or LAN connections read and BARR/RJE sends to a destination.
lines printed or punched
Number of data lines received on the host print or punch stream to the Barr PC.
SNA sessions active
Number of SNA RJE sessions currently active, including printers, punches, readers, console, and commands from the keyboard.
real buffers in use
Number of DOS communication buffers in use by BARR/RJE.
real buffers free
Number of DOS communication buffers available to BARR/RJE. Do not let this value reach 0 or the results might be unpredictable. To be safe, real buffers free should not fall below 20 during maximum use.
XMS buffers in use
Number of extended memory communication buffers in use by BARR/RJE.
XMS buffers free
Number of extended memory communication buffers available to BARR/RJE. Do not let this value reach 0 or the results might be unpredictable. To be safe, XMS buffers free should not fall below 50 during maximum use. Conversely, if XMS buffers free is around 200, XMS has been over allocated.
Press N to advance to page 2.

frames sent
Number of SDLC frames sent to the host.
frames received correctly
Number of SDLC frames received without errors.
frames received with errors
Number of SDLC frames received with either CRC errors or frames shorter than two bytes indicated by an E on the Communication Scope.
undefined frames received
Frames received by BARR/RJE that have an illegal SDLC control field or that are illegal in the current SDLC mode. Indicated by an ! on the Communication Scope.
frames overflowed buffer
Number of SDLC frames whose size exceeded the Barr communications buffer. Usually caused by an error in the frame or MAXDATA at the host exceeding MAXDATA in the BARR/RJE configuration. Indicated by a V on the Communication Scope.
times no reply received in time
Count of receive timeouts. Whether Barr is a remote or host, the program expects to receive frames in a timely manner (usually within 3 seconds). Indicated by a T or N on the Communication Scope.
frames aborted
Number of aborted frames received by BARR/RJE. Indicated by an A on the Communication Scope.
equipment errors
Count of equipment errors caused by any of the following:
Receive overrun – An X on the Scope.
Transmit underrun – An X on the Scope.
Transmit timeout – An F on the Scope. Usually caused by missing clock.
Missing CTS – A C on the Scope.
Press N to advance to page 3.

full duplex frames received
Number of SDLC frames received while BARR/RJE has the poll and is able to transmit. For half-duplex operation, this will always be zero. If this remains zero after logon during full-duplex operation, your remote is defined to the host as half duplex. You must change the remote definition.
frames received out of sequence
Number of SDLC information frames received with the wrong sequence number because a previous information frame probably had a CRC error. The out-of-sequence frames are discarded and the host is asked to retransmit the lost frame.
checkpoint retransmissions
Number of times BARR/RJE started retransmission of SDLC information frames because a poll frame sent from the host did not acknowledge all previously sent frames. Probably a frame was received by the host with a CRC error.
Rej retransmissions
Number of times BARR/RJE started retransmission of SDLC information frames after a Rej frame was received from the host. Probably a frame was received by the host with a CRC error. Rej is used only in full-duplex SDLC.
Rej frames sent
Number of Rej frames sent. Rej is sent in full-duplex SDLC when an information frame is received out of sequence.
Rej frames received
Number of Rej frames received. Rej is sent in full-duplex SDLC when an information frame is rejected because it was received out of sequence.
If you have an 802.2 connection, you can view a series of three screens.

lines read
Total number of data lines read by the Send command or LAN connections and sent to a destination by BARR/RJE.
lines printed or punched
Number of data lines received on the host print or punch stream to the Barr PC.
SNA sessions active
Number of SNA RJE sessions currently active, including printers, punches, readers, console, and commands from the keyboard.
real buffers in use
Number of DOS communication buffers in use by BARR/RJE.
real buffers free
Number of DOS communication buffers available to BARR/RJE. Do not let this value reach 0 or the results might be unpredictable. To be safe, real buffers free should not fall below 20 during maximum use.
XMS buffers in use
Number of extended memory communication buffers in use by BARR/RJE.
XMS buffers free
Number of extended memory communication buffers available to BARR/RJE. Do not let this value reach 0 or the results might be unpredictable. To be safe, XMS buffers free should not fall below 50 during maximum use. Conversely, if XMS buffers free is around 200, then XMS has been over allocated.
Press N to advance to page 2.

frames sent
Number of 802.2 frames sent to the host.
frames received
Number of 802.2 frames received by the Barr PC.
frames discarded
Number of frames lost.
times data was lost
Number of times a frame was only partially received, usually because the frame exceeded the buffer size.
SAP buffers available
Number of Service Access Point receive buffers available. Controlled by the LAN Support program.
Press N to advance to page 3.

frames sent
Number of 802.2 frames sent to the host.
frames received
Number of 802.2 frames received by the Barr PC.
frames received with errors
Number of 802.2 frames received with either CRC errors or frames shorter than two bytes indicated by an E on the Communication Scope.
frames sent with errors
Number of times an error was reported requiring BARR/RJE to retransmit the frame.
timeouts
Number of times a response was not received within the 802.2 timeout period.
Partner Address
Controller Address of the other device. When you connect to the mainframe, the other device is the host. When you connect to another PC, the other device is the address of the other PC.
If you have a Coax connection, you will see this screen:

lines read
Total number of data lines read by the Send command or LAN connections and sent to a destination by BARR/RJE.
lines printed or punched
Number of data lines received on the host print or punch stream by the Barr PC.
SNA sessions active
Number of SNA RJE sessions currently active, including printers, punches, readers, console, and commands from the keyboard.
real buffers in use
Number of DOS communication buffers in use by BARR/RJE.
real buffers free
Number of DOS communication buffers available to BARR/RJE. Do not let this value reach 0 or the results might be unpredictable. To be safe, real buffers free should not fall below 20 during maximum use.
XMS buffers in use
Number of extended memory communication buffers in use by BARR/RJE.
XMS buffers free
Number of extended memory communication buffers available to BARR/RJE. Do not let this value reach 0 or the results might be unpredictable. To be safe, XMS buffers free should not fall below 50 during maximum use. Conversely, if XMS buffers free is around 200, then XMS has been over allocated.
If you have an X.25 connection, you will view a series of four screens.
lines read
Total number of data lines read by the Send command or LAN connections and sent to a destination by BARR/RJE.
lines printed or punched
Number of data lines received on the host print or punch stream to the Barr PC.
SNA sessions active
Number of SNA RJE sessions currently active, including printers, punches, readers, console, and commands from the keyboard.
real buffers in use
Number of DOS communication buffers in use by BARR/RJE.
real buffers free
Number of DOS communication buffers available to BARR/RJE. Do not let this value reach 0 or the results might be unpredictable. To be safe, real buffers free should not fall below 20 during maximum use.
XMS buffers in use
Number of extended memory communication buffers in use by BARR/RJE.
XMS buffers free
Number of extended memory communication buffers available to BARR/RJE. Do not let this value reach 0 because of unpredictable results. To be safe, XMS buffers free should not fall below 50 during maximum use. Conversely, if XMS buffers free is around 200, then XMS has been over allocated.
Press N to advance to page 2.
frames sent
Number of SDLC frames sent to the host.
frames received correctly
Number of SDLC frames received without errors.
frames received with errors
Number of SDLC frames received with either CRC errors or frames shorter than two bytes indicated by an E on the Communication Scope.
undefined frames received
Frames received by BARR/RJE that have an illegal SDLC control field or that are illegal in the current SDLC mode. Indicated by an ! on the Communication Scope.
frames overflowed buffer
Number of SDLC frames whose size exceeded the Barr communications buffer. Usually caused by an error in the frame or MAXDATA at the host exceeding MAXDATA in the BARR/RJE configuration. Indicated by a V on the Communication Scope.
times no reply received in time
Count of receive timeouts. Whether Barr is a remote or host, the program expects to receive frames in a timely manner (usually within 3 seconds). Indicated by a T or N on the Communication Scope.
frames aborted
Number of aborted frames received by BARR/RJE. Indicated by an A on the Communication Scope.
equipment errors
Count of equipment errors caused by any of the following:
Receive overrun – An X on the Communication Scope.
Transmit underrun – An X on the Scope.
Transmit timeout – An F on the Scope. Usually caused by missing clock.
Missing CTS – A C on the Scope.
Press N to advance to page 3.

These are statistics about the types of X.25 frames sent and received. Frames sent display in green in the first column. Frames received by the PC display in magenta in the second column.
These frame types indicate errors:
Frmr – Number of frame rejects sent or received. This error should not occur during normal operation. If the link is lost and the value here is not 0, contact Barr Technical Support and supply a line trace.
Uns F bit – Unsolicited F bit received from the host. This error should not occur during normal operation. If the link is lost and the value here is not 0, contact Barr Technical Support and supply a line trace.
REJ – Number of frames rejected because they were out of sequence.
Press N
to advance to page 4.

Packet-level statistics provide information about the types of packets received. One packet is sent in each Info frame. Packets sent display in green in the first column. Packets received to the PC appear in magenta in the second column.
A line trace is a trace of all frames transferred over the communications line. Follow these steps to create a line trace.
If the problem Barr Technical Support is investigating involves receiving a file (for example, a file is not printing or is printing incorrectly), you need to receive the file during the line trace and write it to PC disk so you can provide it to Barr Technical Support. Assign the device where the file will be received to a file destination. The software automatically names the trace file DUMP. Be sure to use a different file name for the file you are receiving.
From the Operation screen, select Advanced.
From the Advanced menu, select Assign Devices.
Select the source device on which the file will be received.
Select (FILE) as the destination.
Enter a filename (for example, DATA).
Return to the Advanced menu by pressing ESC.
 You only need to change the destination to (FILE)
if the file you are creating will be used for diagnostics and you are
not currently writing to a file.
You only need to change the destination to (FILE)
if the file you are creating will be used for diagnostics and you are
not currently writing to a file.
Set up the Barr software to generate a line trace.
Check that the Line trace buffer size option is large enough to record the trace. See section 18.6, Tuning and Global Options, Trace and Memory Options, for more information about this option.
From the Advanced menu, select Diagnostics.
From the Diagnostics menu, select Link Diagnostics.
From the Diagnostics screen, select Line Trace.
The following screen displays:

Press the PLUS SIGN key to change Trace to on.
If necessary, change other line trace options as described below.
Trace
Choose whether to enable the trace.
Off – Default.
On – Trace data is written to the file DUMP.
Format
Select the trace format.
Short – Only the first 59 bytes of the information frame are written to disk.
Full – Default. All bytes of the information frame are written to disk.
Change the filename if necessary. The default is DUMP.
After you select Line Trace options, press ENTER to save your settings.
Recreate the problem during the line trace. If the problem involves receiving a file (for example, a file is not printing or is printing incorrectly), you need to receive the file during the line trace. While the line trace is on, you might see status messages such as CON has begun, CON has ended, and PR1 has begun.
You need to send two files to Barr Technical Support. Copy the line trace file (see the sample below), usually called DUMP, and the received file to disk with a unique file name. Then send the disk or the file to Barr Systems. See the Contact Barr Systems Electronically booklet for more information about sending disks or files to Barr Systems.
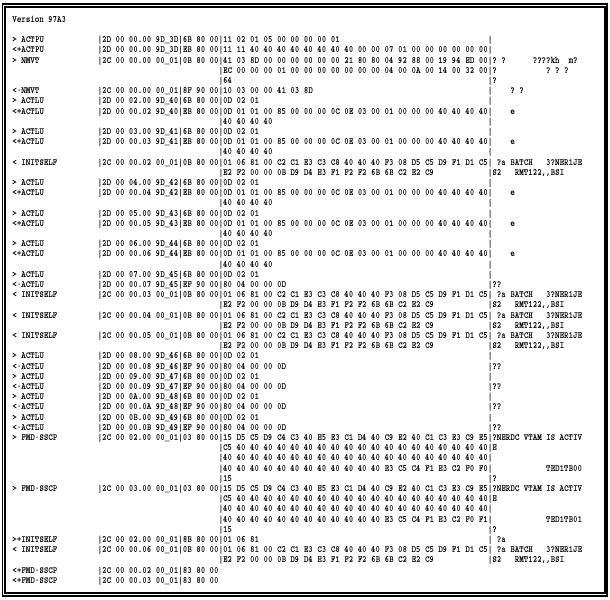
Figure 23-1. A line trace can help Barr Technical Support diagnose problems.
Bind data defines the operational rules for each partner LU. Choose the Bind Data option to display the bind data.
The bind data originates from the VTAM LOGMODE table, the PU definition, and the RJE system. JES2 parameters override LOGMODE parameters for the bind data.

From the Link Diagnostics, Diagnostics menu, select Bind Data.

This screen displays the bind data for all LUs.
Scroll through the LUs with the UP ARROW and DOWN ARROW keys. You might need to press DOWN ARROW more than once to change the display.
The line with a blank LU number contains an RJE bind data sample. The other lines show actual bind data. Each bind data byte is assigned a number from 0 to 25. Bytes 14 through 25 of the bind data correspond to bytes 1 through 12 of the LOGMODE data’s PSERVIC parameter. For more information about the PSERVIC parameter, see Chapter 1 of the Barr Host Definition Guide. For more information about bind data, see the IBM publication, SNA Sessions between Logical Units.
Table 23-2 describes each byte displayed in the bind data.
Table 23-2. Bind Data Description
|
Byte |
Values |
Description |
LOGMODE |
|
0 |
31 |
Bind command code |
|
|
1 |
01 |
Activation code is non-negotiable |
|
|
2 |
03 |
FM profile |
FMPROF=X’03’ |
|
3 |
03 |
TS profile |
TSPROF=X’03’ |
|
4 |
A3 |
Primary LU protocol; compression on receive |
PRIPROT=X’A3’ |
|
A1 |
Primary LU protocol; no compression on receive |
PRIPROT=X’A1’ | |
|
B3 |
Primary LU protocol; compression on receive |
PRIPROT=X’B3’ | |
|
B1 |
Primary LU protocol; no compression on receive |
PRIPROT=X’B1’ | |
|
5 |
A3 |
Secondary LU protocol; compression on send |
SECPROT=X’A3’ |
|
A1 |
Secondary LU protocol; no compression on send |
SECPROT=X’A1’ | |
|
B3 |
Secondary LU protocol; compression on send |
SECPROT=X’B3’ | |
|
B1 |
Secondary LU protocol; no compression on send |
SECPROT=X’B1’ | |
|
6 |
70 |
Common LU protocol |
COMPROT=X’7080’ |
|
7 |
80 |
||
|
8 |
07 |
Barr to Controller pacing |
SSNDPAC=7 |
|
9 |
07 |
Controller to Barr pacing; PACING=7 |
SRCVPAC=7 |
|
10 |
85 |
Input buffer size=256 |
RUSIZES=X’8585’ |
|
86 |
Input buffer size=512 |
RUSIZES=X’8686’ | |
|
87 |
Input buffer size=1024 |
RUSIZES=X’8787’ | |
|
F3 |
Input buffer size=120 |
RUSIZES=X’F3F3’ | |
|
F4 |
Input buffer size=240 |
RUSIZES=X’F4F4’ | |
|
F5 |
Input buffer size=480 |
RUSIZES=X’F5F5’ | |
|
F6 |
Input buffer size=960 |
RUSIZES=X’F6F6’ | |
|
11 |
85 |
Output buffer size=256 |
|
|
86 |
Output buffer size=512 |
| |
|
87 |
Output buffer size=1024 |
| |
|
F3 |
Output buffer size=120 |
| |
|
F4 |
Output buffer size=240 |
| |
|
F5 |
Output buffer size=480 |
| |
|
F6 |
Output buffer size=960 |
| |
|
12 |
07 |
Host RJE to Controller pacing; (LU)VPACING=7 |
PSNDPAC=7 |
|
13 |
07 |
Controller to Host RJE pacing; (APPL)VPACING=7 |
|
|
14 |
01 |
LU type 01 |
PSERVIC=X’01 |
|
15 |
10 |
FM header set 1 |
PSERVIC=X’0110 |
|
16 |
20 |
LU profile for PDIR (SETUPHDR) |
PSERVIC=X’011020 |
|
40 |
LU profile for compaction |
PSERVIC=X’011040 | |
|
60 |
LU profile for compaction and PDIR (SETUPHDR) |
PSERVIC=X’011060 | |
|
17 |
00 |
Reserved |
PSERVIC=X’01106000 |
|
18 |
91 |
SCS output; Full base +TRN +IRS |
PSERVIC=X’0110600091 |
|
F1 |
SCS output; FCBLOAD without SLD |
PSERVIC=X’01106000F1 | |
|
F9 |
SCS output; FCBLOAD with SLD |
PSERVIC=X’01106000F9 | |
|
19 |
00 |
Not used |
PSERVIC=X’01106000F900 |
|
20 |
C0 |
Output media – document and card files |
PSERVIC=X’01106000F900C0 |
|
E0 |
Output media – document, card, and exchange files* |
PSERVIC=X’01106000F900E0 | |
|
20 |
Output media – exchange files* |
PSERVIC=X’01106000F90020 | |
|
40 |
Output media – card (reader and punch) files |
PSERVIC=X’01106000F90040 | |
|
80 |
Output media – document files |
PSERVIC=X’01106000F90080 | |
|
21 |
00,80 |
FM header flags |
PSERVIC=X’01106000F9008000 |
|
22 |
00 |
Reserved |
PSERVIC=X’01106000F900800000 |
|
23 |
01 |
SCS input includes TRN+IRS |
PSERVIC=X’01106000F90080000001 |
|
24 |
00 |
Reserved |
PSERVIC=X’01106000F9008000000100 |
|
25 |
40 |
Input media – card format |
PSERVIC=X’01106000F900800000010040’ |
*Barr software does not support exchange media.
A common use of VTAM commands is to send the IBM test command to verify that VTAM is operating. VTAM returns a message with the 48 most common characters. You can send VTAM commands from any active LU.
Start at the Link Diagnostics, Diagnostics menu.
Select VTAM Commands.

Enter the LU number from which the command should be sent.
Enter the command to be sent. The default is IBMTEST 1, which is the IBM test command to verify that VTAM is operating.
NetView is a licensed mainframe program that collects information about SNA network operation and performance. It resides on the mainframe and interacts with PUs to collect network operation and performance information. It includes the functions of the Network Communications Control Facility (NCCF), Network Logical Data Manager (NLDM), and Network Problem Determination Application (NPDA) management products as well as other host-based utilities.
If your host computer supports NetView, you can set up your BARR/RJE software to use it. The software allows NetView program traffic plus the SNA commands Request Maintenance Statistics (REQMS) and Record Formatted Maintenance Statistics (RECFMS). See section 18.4, Tuning and Global Options, Modem and Line Control, for information about enabling NetView alerts. See your 3270 for RJE manual for information about enabling the NetView Response Time Monitor (RTM).
NetView interacts with remote PUs to collect network operation and performance information. These interactions are carried in a special SNA frame called a Network Management Vector Transport (NMVT). The workstations connected to the mainframe create and process three types of NMVTs:
RTMs
operator alerts
application alerts
RTM is performed by collecting data from 3270 workstations only when you have RJE+3270. Timers located at each workstation record response times. Then the NetView program collects the workstation timer information (either periodically or by host operator demand) and stores it in a database at the host. The NetView host operator can issue a command to tabulate and graph the response time statistics.
NetView provides two types of alerts. Both BARR/RJE and RJE+3270 support these alerts.
For operator alerts, the operator enters the alert message text on the Operator Alert screen. The alert gets sent to the NetView program. The host operator also can be notified, depending on the priority assigned to the message.
Application alerts are sent to the NetView program when the remote workstation detects a data stream error. For example, a data stream error could occur if the host tries to write a 132-column screen on an 80-column 3270 display. Application alerts include SNA state errors (20xx), request errors (10xx), and request rejects (08xx), which BARR/RJE displays as sense codes on the console. For a list of possible sense codes and what they indicate, see the sense codes and sense data for LU-to-LU Session Type 1 in the IBM publication SNA Sessions Between Logical Units.
Follow these steps to view the Response Time Monitor screen.
Start at the Link Diagnostics, Diagnostics menu.
Select NetView. The NetView screen displays.

Select Response Time Monitor.
 For the Response Time Monitor
option to appear on your screen, you must have RJE+3270.
For the Response Time Monitor
option to appear on your screen, you must have RJE+3270.
The Response Time Monitor screen displays.

Session
Indicates for which of the four 3270 sessions RTM data is displayed.
Measurement
Describes the end of the transaction parameter. Select the action that stops the transaction timer. Choose from the following actions:
First Character – When the software writes the first character on the screen from the host 3270 data stream.
Keyboard Unlock – When the software detects that the keyboard is available as indicated by the 3270 and SNA data stream commands. The software must receive Change Direction (CD) and Write Control Character (WCC) must be set to restore keyboard, or the software must receive the End Brackets (EB) command.
CD/EB – When the software receives the CD or EB commands. Same as Keyboard Unlock, except that the WCC restore does not have to be present.
Last Character – When the software writes the last character on the 3270 screen from the data stream.
Time intervals set by
Indicates who sets the time intervals.
Local – The local operator sets time intervals.
Host – The host sets time intervals remotely.
LTTI
Last Transaction Time Indicator. Displays the last transaction response time.
Table of Response Times & Counters
The counters indicate how many transaction times fell in the response time ranges. These ranges display in seconds and are set either by the local operator or the host operator. The last counter represents transactions that exceeded the largest range.
To access the Operator Generated Alerts screen, start at the NetView screen.

Select Operator Alerts.

Operator-generated Alert Screen
There are 20 Operator-generated Alert screens. Each screen represents a user action code that correlates with up to 20 product-unique panels, which you can define in the NPDA database as part of the system generation process.
Message
Optional 120-character text message.
Q1
8-character optional qualifier.
Q2
8-character optional qualifier.
Q3
8-character optional qualifier.
After NetView receives the alert message, it uses the user action code or screen number to correlate the message with one of the product-unique panels defined in NPDA. The text message and qualifiers help the operator pass error codes, telephone numbers, and a message to the NetView operator.
Barr Technical Support can often diagnose unusual communications problems by examining a copy of memory. The copy of memory generated by BARR/RJE is called a memory dump. The memory dump is output to a file named DUMP.
You can change the name of the file to which the memory dump
is output. See step 1 below.
If Technical Support requests that you provide a memory dump, follow these steps.
If the problem Barr Technical Support is investigating involves receiving a file (for example, a file is not printing or is printing incorrectly), you need to receive the file during the memory dump and write it to the PC disk so you can provide it to technical support. Assign the device where the file will be received to a file destination. The software automatically names the memory dump file DUMP. Be sure to use a different file name for the file you are receiving.
From the Operation screen, select Advanced.
From the Advanced menu, select Assign Devices.
Select the source device on which the file will be received.
Select (FILE) as the destination.
Enter a filename (for example, DATA).
Return to the Advanced menu by pressing ESC.
 You only need to change the destination to (FILE)
if the file you are creating will be used for diagnostics and you are
not currently writing to a file.
You only need to change the destination to (FILE)
if the file you are creating will be used for diagnostics and you are
not currently writing to a file.
Recreate the problem during the memory dump. If the problem involves receiving a file, you need to receive the file during the memory dump. While the memory dump is on, you might see status messages such as CON has begun, CON has ended, and PR1 has begun.
After you recreate the problem, generate a memory dump as follows:
From the Operation screen, select Advanced.
From the Advanced screen, select Diagnostics.
From the Diagnostics menu, select Memory Dump.
The Barr software writes memory dump information to the DUMP file in your current directory. You can view the DUMP file in the DOS session by using a text editor, the more command, or the LIST program.
Do not try to print
the DUMP file. It might be huge
and contain unprintable characters.
If you are not certain your memory dump worked, compare your DUMP file to the sample in Figure 23-2.
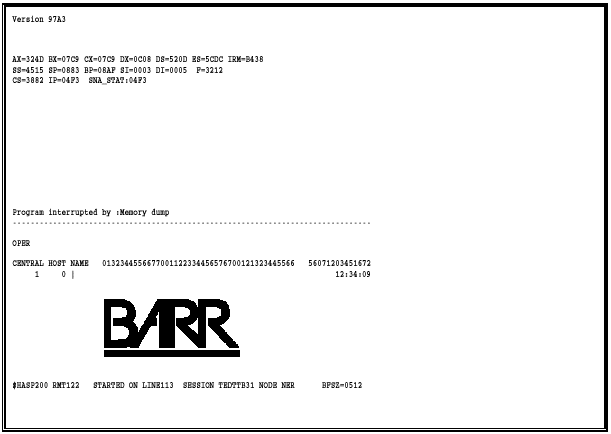
Figure 23-2. A memory dump includes the version number and PC registers.
Your DUMP file should match the format of the sample, but the data will not match. Under extreme circumstances, your program could abort and automatically create a memory dump. Some of the fields in the dump will not match the sample, but the format is the same.
A memory dump begins with the version of the software (for example, 97A3), PC registers, and copies of Barr screens.
You need to send two files to Barr Technical Support. Copy the DUMP file and the received file to disk. Be sure to assign them unique file names. Then send the files to Barr Systems. See the Contact Barr Systems Electronically booklet for more information about sending disks or files to Barr Systems.
Use this option to list the Barr hardware installed in your PC and the hardware serial numbers. You can display information for hardware with ID chips, which includes the SYNC, T1-SYNC, PRINT370 (Rev. 4), and ASYNC8 adapters and new hardware keys.
Start at the Diagnostics menu.

Select Hardware Queries.
The Serial Numbers screen displays.
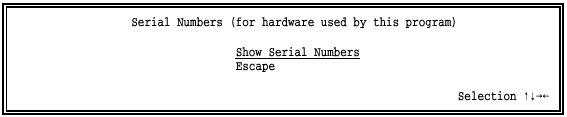
Select Show Serial Numbers.
A list of serial numbers displays. The following example shows the serial number for a SYNC adapter.

Press any key to return to the Serial Numbers screen.