 From the Installation Description menu, select Printer Forms.
Business applications typically involve printing structured reports on special paper forms such as checks, invoices, or tax forms. When a file requiring special forms is sent to the printer, the data must be formatted to print within the boundaries of the form.
You can use the Barr Printer Forms feature to define software forms that provide print format information. Each form also contains a form name to indicate the type of forms paper that should be used. At some sites, format information can be provided by the mainframe computer, so you do not need to define forms in the Barr software. See Appendix F, Form Information Sources, to determine whether you need to define printer forms in the software.
When BARR/RJE is ready to print a file, it loads the format information into the printer. You can configure the software to load the form automatically or to load it when a manual command is issued by the PC operator. If you plan to use an automatic method for mounting forms, see section 18.2, Tuning and Global Options, Printer Control, for additional settings to make in the Barr software.
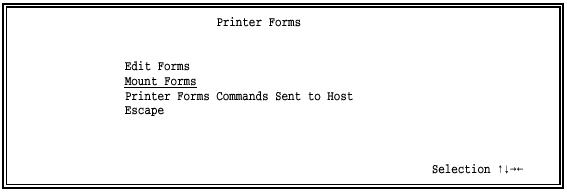
If you need to define printer forms in the Barr software, use the Printer Forms menu.
From the Installation Description menu, select Printer Forms.
The following menu displays:
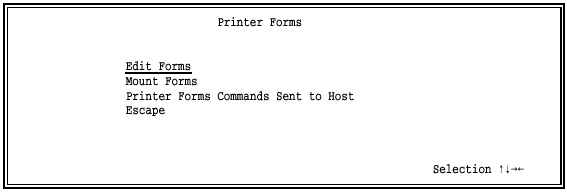
The menu options are described briefly below. The following sections describe them in more detail.
Edit Forms
Create or modify printer forms.
Mount Forms
Specify which form to use with each RJE printer at software startup. This operation is also called loading or mounting a form. The forms you select here are used each time the software starts, but forms can be changed manually or automatically during software operation. Use this option to set up the initial form if you are manually mounting forms from the Operation screen. You also can use this option to mount an initial form when you are using the $HASP190 or Power 1Q40A message.
Printer Forms Commands Sent to Host
Specify commands to send to the host computer when a form is mounted in the software. Use this option you mount forms manually from the Operation screen or automatically with the $HASP190 or Power 1Q40A messages.
Escape
Return to the Installation Description menu.

You can enter up to 100 forms in the BARR/RJE software. If you need to define more forms, a special version of the software is available which allows you to create up to 200 forms. Contact Barr Systems to obtain the 200-forms version.
A form definition includes a form name plus format information. The format includes lines-per-form, print lines-per-form, and lines-per-inch settings as well as carriage control stops. Additionally, Barr forms can include an optional printer control index for sending printer control data.
The values you enter for lines-per-form, print lines-per-form, and lines-per-inch are not actually sent to the printer. The Barr software converts these values to the appropriate commands for your printer type. You select the printer type under Devices and Printers for the individual LPT, COM, and NET devices you enable. See section 8.6, Choose Printer Type, for more information.
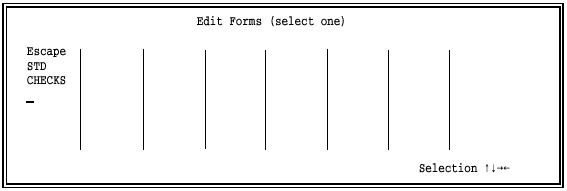
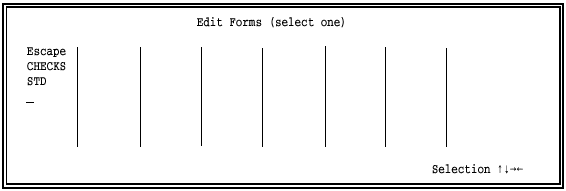
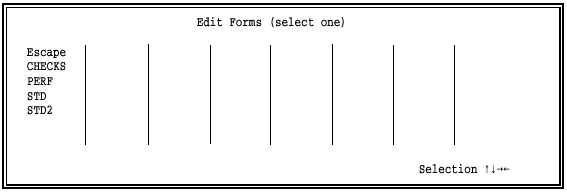
You maintain forms from the Edit Forms menu.
From the Printer Forms menu, select Edit Forms.
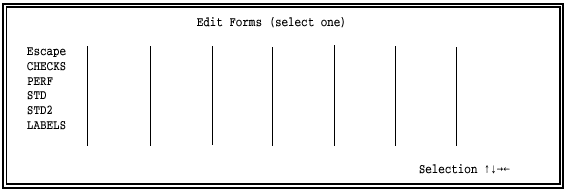
The initial menu contains only blank entries.
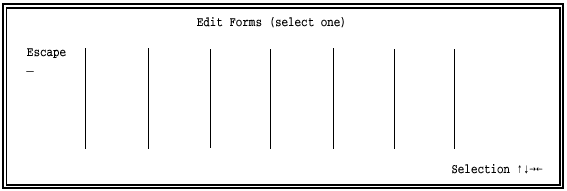
To create a form, move the cursor to a blank entry in the list and press ENTER.
While you are creating forms, you can display them in alphanumeric order in the list by leaving and then returning to the forms menu. Follow these steps to sort the list:
From the Edit Forms menu, press ESC to return to the Printer Forms menu.
From the Printer Forms menu, select Edit Forms and press ENTER to display the sorted forms list.
During software operation, the forms will automatically display in alphanumeric order.
If you are using software with the 200 forms option, you will see a
scroll prompt ( Scroll
  ) near the
top of the screen, above the Escape
selection. Use this feature to display an additional page of 100 form
entries.
) near the
top of the screen, above the Escape
selection. Use this feature to display an additional page of 100 form
entries.
Follow these steps to use the scroll feature:
Use the UP ARROW or DOWN ARROW keys to move the cursor to the scroll prompt.
Put the cursor on the arrow that indicates the direction you want to move, either to the previous screen or the next screen, and press ENTER.
Note that the prompt contains a vertical bar (|) when you reach either the
beginning (| Scroll ) or end ( Scroll |) of the
list.
A format entry screen displays for each blank entry you select.
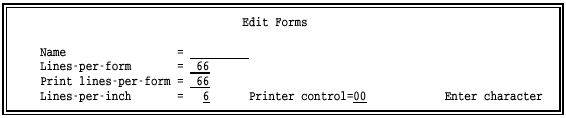
Name
Enter a form name with up to eight characters. The name you choose should match the form name used at the mainframe. The form name for an RJE output file is specified by using job control language (JCL) in the mainframe program that produces the print output.
If you use SETUPHDR FORMNAME, $HASP190 FORMNAME, or Power 1Q40A FORMNAME to automatically mount forms, the form name you assign in the form definition must match the form name the host will provide. If you use $HASP190 FCBNAME or SETUPHDR FCBNAME to automatically mount forms, the form name you assign must match the FCB name the host will provide. Section 18.2, Tuning and Global Options, Printer Control, describes the options that control automatic forms mounting.
 You can define fewer Barr forms if the name you assign matches
the host FCB name instead of the host form name. Because several forms
can use the same FCB, the number of FCBs needed is less than the number
of forms needed.
You can define fewer Barr forms if the name you assign matches
the host FCB name instead of the host form name. Because several forms
can use the same FCB, the number of FCBs needed is less than the number
of forms needed.
Lines-per-form
Specify the number of lines that can fit on the paper form. This value is the page length in inches multiplied by the number of print lines-per-inch. For example, an 11-inch page with 6 lines-per-inch has 66 lines-per-form.
Print lines-per-form
Specify the maximum number of print lines available on the paper form. Usually this number is the same as lines-per-form. If this number is less than the lines-per-form, it indicates that some lines at the top or bottom of the page will be skipped during printing.
If you select an ASCII receive mode in the software, this setting controls when form feeds occur during printing. As data is sent to the printer, the software counts the number of print lines and issues a form feed when the print lines-per-form is reached. Then the counter is set to 0 and the process begins again. If form feeds are already included in the data, each time a form feed occurs the counter is reset to 0.
Lines-per-inch
Select the number of print lines per vertical inch. Choices are 6 and 8.
Printer control
A two-digit hexadecimal index used to send optional printer control data to the printer. The index references an entry in the Printer Control Data table defined under Devices and Printers. You can use printer control data to select special printer features such as landscape page orientation and proportional character spacing. Examples of how to use printer control data with printer forms are provided later in this section. The default value 00 means that printer control data is not used.
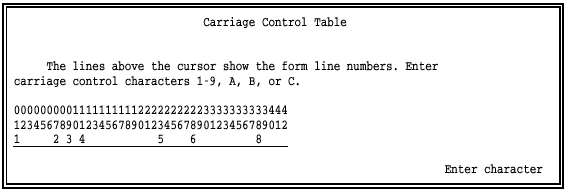
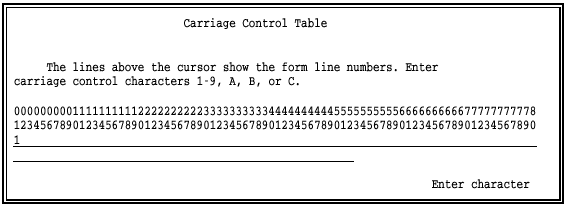
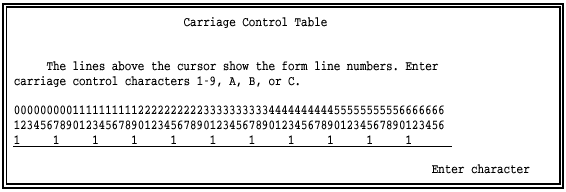
After you complete the fields on the Edit Forms screen and press ENTER, the Carriage Control Table screen displays.
Carriage control stops are used to quickly advance the paper to a specified line rather than moving the paper up one line at a time. Stop characters are included in the data from the mainframe computer. When a stop character is encountered at the beginning of a data line, the paper is advanced to the line indicated in the form definition’s Carriage Control Table. See Carriage Control Characters later in this section for more information about carriage control stops.
A carriage control stop character can be assigned to any line on the form. Valid control characters are 1 to 9 and A to C.
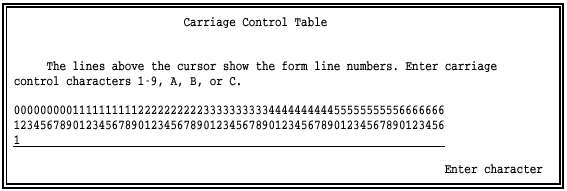
Enter the carriage control characters for the form.
The line numbers for the form display above the carriage control stop entry line, beginning with line 01. Note that the number of lines in the Carriage Control Table equals the number you entered for Print lines-per-form.
Because line 01 is the most common location for stop 1, the Carriage Control Table for each form contains a 1 stop on line 01 by default. If your file requires stop 1 on a different line, you can change the stop location.
FORTRAN and COBOL programs use the first character of the print line as a carriage control character. The action of this carriage control character is defined by the ANSI standard X3.78-1981 level 2A.
Many programs use only a 1 or a blank as a carriage control character to advance the printer. The 1 usually means go to a new page. The blank means print the data single-spaced and advance to the next line. However, forms such as checks and invoices might require additional carriage control stops.
Carriage control stops and their meanings are listed in the following table.
Table 13-1. Carriage Control Characters
|
Carriage Control Character |
Action of characters before line is printed |
|
(blank) |
Space 1 line |
|
0 |
Space 2 lines |
|
- |
Space 3 lines |
|
+ |
Suppress space (overprint line) |
|
1 |
Skip to stop 1 (usually advance to new page) |
|
2 |
Skip to stop 2 (channel 2) |
|
3 |
Skip to stop 3 (channel 3) |
|
4 |
Skip to stop 4 (channel 4) |
|
5 |
Skip to stop 5 (channel 5) |
|
6 |
Skip to stop 6 (channel 6) |
|
7 |
Skip to stop 7 (channel 7) |
|
8 |
Skip to stop 8 (channel 8) |
|
9 |
Skip to stop 9 (channel 9) |
|
A |
Skip to stop A (channel 10) |
|
B |
Skip to stop B (channel 11) |
|
C |
Skip to stop C (channel 12) |
The following examples show you how to define several common forms, including a standard form, a form for printing checks, a form that skips the paper perforation, a two-page form, and one-inch labels.
Many print applications produce general listings or reports that are printed on plain or standard paper. A common name for the standard form is STD. If you use one of the automatic methods for mounting Barr forms, you can use the STD form as a backup in case a form definition is omitted. If the specified form is not in the table, BARR/RJE will load the STD form if you have defined it.
To define the standard form, follow these steps from the Edit Forms menu:
Select a blank entry from the list.
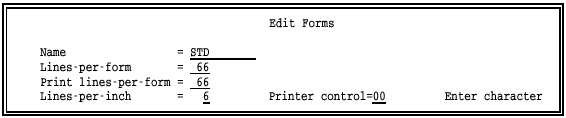
Enter STD for the form name. The form name you assign must match the form name specified in the host JCL for the job which generates the checks listing. In this example, the form name is STD.
Enter the values for the remaining options. The standard form usually has 6 lines-per-inch and 66 lines-per-page, so you might want to use the default values.
Press ENTER to display the Carriage Control Table screen.
Enter the carriage control stops for the standard form. Usually, the standard form has only one carriage control stop, a 1 on the first line of the page. On the screen, a 1 stop is defined for line 01 by default.
Press ENTER.

The form list is updated to reflect the new form definition.
This example shows how to create a form for printing checks. The check form in this example includes a check stub and has a total length of 42 lines with 6 lines-per-inch.
Follow these steps from the Edit Forms menu:
Select a blank entry from the list.
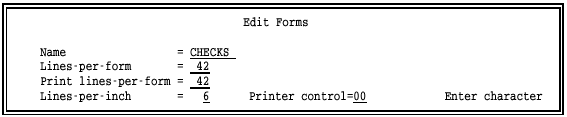
Enter the form name. The form name you assign must match the form name specified in the host JCL for the job that generates the checks. In this example, the form name is CHECKS.
Enter 42 for both the lines-per-form and the print lines-per-form.
Enter 6 for the lines-per-inch.
Press ENTER to display the Carriage Control Table screen.
Note that the length of the entry line reflects the value you entered for Print lines-per-form.
Enter the carriage control stops for the check. Typically, carriage control stops are used on the lines where the date, payee name, dollar amount, and other information will print.
When you press ENTER, the form list is updated to reflect the new form definition:
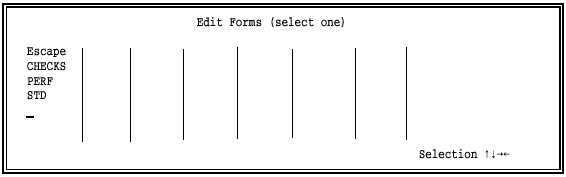
To re-display the forms in alphabetical order, pressESC, select Edit Forms, and then press ENTER.
This example illustrates stepping over the six lines that surround the page perforation. The sample form is 88 lines long with vertical spacing of 8 lines-per-inch, but you can print on only 82 of the lines.
Select a blank entry from the form list.
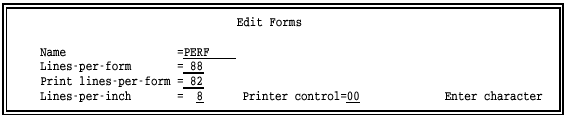
Enter the form name. The form name you assign must match the form name specified in the host JCL for the job that generates the print output. In this example, the form name is PERF.
Enter 88 for lines-per-form, 82 for print lines-per-form, and 8 for lines-per-inch.
Press ENTER to display the Carriage Control Table screen.

Note that the length of the entry line reflects the value (82) you entered for Print lines-per-form. The entry line wraps to a second line after 80 characters.
In this example, the default Carriage Control Table with a 1 on line 01 is all that is required.
When you press ENTER, the form list is updated to reflect the new form definition:
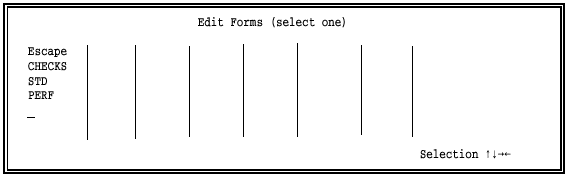
To re-display the forms in alphabetical order, press ESC, select Edit Forms, and then press ENTER.
This example shows how to create a two-page form that lets you control whether data will begin printing on an odd or even page. This is also called printing on the inside fold or outside fold of the paper stack. The form definition must have two pages, so the number of print lines-per-form will be twice the number of lines-per-form.
Select a blank entry from the forms list.
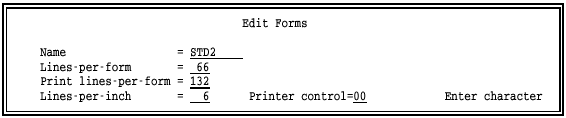
Enter the form name. The form name you assign must match the form name specified in the host JCL for the job that generates the print output. In this example, the form name is STD2.
Leave lines-per-form at the default of 66 which indicates the page size. Enter 132 for the print lines-per-form to indicate that the form contains two pages. Leave the lines-per-form at the default of 6.
Press ENTER to display the Carriage Control Table screen.
Note that the length of the entry line reflects the value you entered for Print lines-per-form. The entry line wraps to a second line after 80 characters.
The default Carriage Control Table with a 1 stop in the first position is all that is required.
When you press ENTER, the list is updated to reflect the new form definition:
This example shows how to switch from printing on continuous feed forms paper for line printers to individual sheets for laser printers. Suppose you need to print one-inch labels on a laser printer. Each label sheet is a standard 8.5 by 11 inch page, with 11 labels per column. At the mainframe, the page size was one inch (one label). For the laser printer, you need to define the form length to match the actual page size (one sheet). You also need to define a Carriage Control Table with 1 stops at one-inch intervals for the start of every label. When it encounters a form feed, the Barr software moves to the top of the next label. The software tracks where it is on the page, and when it reaches the end of the sheet it advances to the next page.
Select a blank entry from the forms list.
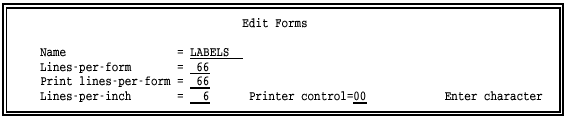
Enter the form name. The form name you assign must match the form name specified in the host JCL for the job that generates the print output. In this example, the form name is LABELS.
Leave lines-per-form and print lines-per-form at the default of 66 (the number of lines per sheet) and lines-per-inch at the default of 6.
Press ENTER to display the Carriage Control Table screen.
Type 1 stops at one-inch intervals, for the top of each label.
When you press ENTER, the list is updated to reflect the new form definition:
You might want to specify other printer commands for each form. You can use printer command sequences to select compressed or standard print characters or change the typeface on either line or laser printers. You also can choose portrait or landscape page orientation on laser printers.
Commands are stored in the Printer Control Data table defined for LPT, COM, and NET devices under Devices and Printers. The two-digit Printer control index in the form definition references an entry in the Printer Control Data table. When a job requiring a form is ready to print, the software sends the form information to the printer followed by the printer control data that corresponds to the index specified in the form definition.
If you use beginning or ending printer control data strings in addition to a string referenced by a printer form, the control strings are sent to the printer in the following order:
Starting printer control string
Printer form information
Printer control string associated with the printer form
Print job
Ending printer control string
For more information about starting and ending printer control strings, see section 8.8, Printer Control Data.
The following examples illustrate how you can use printer control data with forms created in the Barr software.
See section 8.8, Printer Control Data, for more information about how to enter control sequences into the table. See your printer manual for a list of the control codes your printer uses.
This example shows how to use a form named COMPRESS with printer control data to print characters in a compressed format. The Printer control index value 01 is used to link the form to a command sequence beginning with 01 in the Printer Control Data table.
This example requires you to make entries on both the Edit Forms and Printer Control Data screens.
The printer codes shown in this example are for an IBM 80 CPS matrix printer which compresses print when the hexadecimal code 0F is sent to the printer. Hexadecimal 12 sets the printer back to standard mode.
From the Edit Forms menu, create a form named COMPRESS.
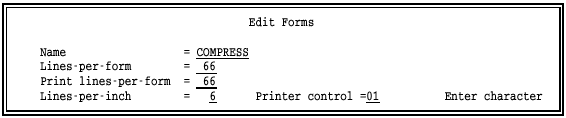
Set the value for Printer
control to 01.
Follow these steps to enter the printer control data for the selected LPT, COM, or NET device:
Enter a hexadecimal 12 at the first position in the table. The string at the beginning of the table is sent before every job.
Skip the next two pairs of zeros (00 00) to separate the control strings. This separator is required.
Begin the next string with the printer control index 01.
Enter the compress control code 0F.
End the control string with two pairs of zeros (00 00). This terminator is required.
Your control data sequence will look like this:

When a file requiring the Barr form COMPRESS is ready to print, the software searches the Printer Control Data table for the string that begins with the specified index (in this example, 01).
First, the software sends the beginning code 12 to the printer. Then it sends the form information to the printer, followed by the control string 0F associated with the index 01. Finally, the software sends the file to the printer.
A laser printer is capable of printing pages with portrait (8.5 x 11) and landscape (11 x 8.5) page orientation. You can set the desired mode on the printer with printer commands.
This example shows how to define a form named PORTRAIT to print in portrait page orientation and a form named LAND to print in landscape format.
On the HP LaserJet, the hexadecimal landscape mode codes are 1B 26 6C 31 4F and the portrait mode codes are 1B 26 6C 30 4F. The following steps describe how to define these two sample forms.
Create forms named LAND and PORTRAIT as follows:
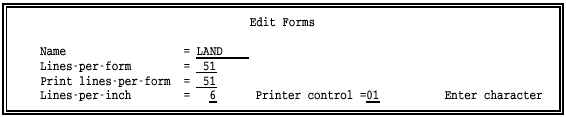
For the LAND form, enter 01 as the Printer control index.
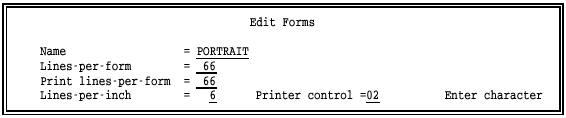
For the PORTRAIT form, enter 02 as the Printer control index.
Next, you need to enter the printer control data for the selected LPT, COM, or NET device.
Skip the first two pairs of zeros (00 00) at the beginning of the table. This means a printer reset string will not be sent to the printer before each file.
Begin the landscape control string with the index 01, followed by the landscape codes, and terminate the string with two pairs of zeros (00 00).
Begin the portrait control string with the index 02, followed by the portrait codes, and terminate the string with two pairs of zeros (00 00).
Your control data will look like this:

When a file requiring the form LAND is ready to print, BARR/RJE searches the Printer Control Data table for an entry beginning with the index 01 and sends the corresponding codes to the printer.
A similar process occurs when a file requiring the form PORTRAIT is ready to print. The software searches the Printer Control Data table for an entry beginning with the index 02 and sends the corresponding codes to the printer.
During software operation, you can use the Operation screen’s Mount Forms command to select a form for an RJE print stream (PR1 to PR7). Forms enable files received on the print stream to print in the correct format.
Use the Mount Forms command if either of these conditions is true:
You are manually mounting forms from the Operation screen.
You are using the JES2 $HASP190 message or VSE/POWER 1Q40A message to automatically mount forms. (It is sometimes advisable to mount an initial form for these automatic methods. Also, the printer commands sent to host are useful.)
Mounting a form causes information from the selected form to be added to the file. The form information is stored in a Barr spool header record at the beginning of the file. When the file is ready to print, BARR/RJE converts the spool header to commands and sends them to the printer.
If you use either the manual or automatic means for mounting forms, use the Mount Forms option on the Installation Description’s Printer Forms menu to mount an initial form. The initial form is used each time the software starts. Additionally, the Mount Forms command displays on the Operation screen so you can change forms during software operation. See section 21.6 for more information about mounting forms during software operation.
You maintain forms from the Mount Forms menu.
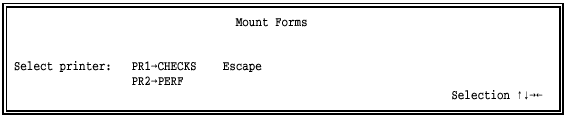
Select Mount Forms from the Printer Forms menu.
The Mount Forms menu displays a list of the RJE printers you have enabled. If two RJE printers are enabled, your screen will look similar to the one below:
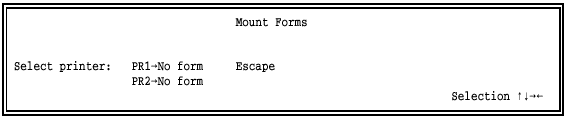
The name of the assigned form displays next to each printer name. The selection No Form indicates that a form has not been assigned.
Select a printer.
A list of available forms displays:
Select a form.
If you use one of the automated methods for mounting forms (you set Mount forms by to one of the FORMNAME or FCBNAME choices), the selection prompt reflects the method for naming forms.
If you name forms for the host form name, the prompt is Select form for PR1.
If you name forms for the host FCB name, the prompt is Select FCB for PR1.
The forms you defined under Edit Forms display in the selection list. To assign a form, select a form from the list. Use the first selection, No Form, if you do not want to assign a form.
See Mount Forms Examples below for the steps required to assign a form. The selection screens displayed are slightly different depending on whether only one RJE printer or more than one RJE printer is defined.
If you select No form for a printer, a form is not assigned and you are returned to the previous screen.
A Carriage Control Table will not be defined for files that are received when the No form selection is assigned. If carriage control stops occur in the files and a Carriage Control Table is not defined, the stops will be handled as follows:
Where a 1 stop occurs in a file, the software advances the paper to a new page.
Where stops 2 to 12 occur in a file, the software advances the paper one line.
Only 32 forms display at a time. If you define more than 32 forms, use
the scroll feature to display the additional forms. A scroll prompt ( Scroll ) displays in the bottom-left corner
of the screen.
Follow these steps to use the scroll feature:
Use the UP ARROW or DOWN ARROW keys to move the cursor to the scroll prompt.
Put your cursor on the arrow that indicates the direction you want to move, either to the previous screen or the next screen, and press ENTER.
A vertical bar (|)
displays in the scroll prompt when you reach either the beginning (| Scroll ) or end
( Scroll |) of the list.
When you mount forms, the screens differ slightly depending on whether you have defined only one printer or several printers. The following examples show how to mount forms in each case.
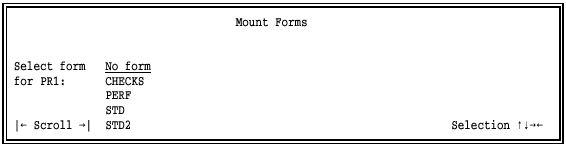
This example shows how to assign a form if you have defined only one RJE printer. When you select Mount Forms, a list of forms displays:
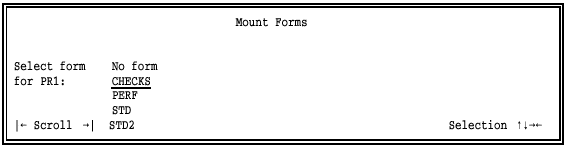
Select a form for PR1. For example, select the form CHECKS.
Press ENTER to mount the form and return to the Printer Forms menu.
This example shows how to assign forms if you have defined several RJE printers. When you select Mount Forms, a list of printers displays:
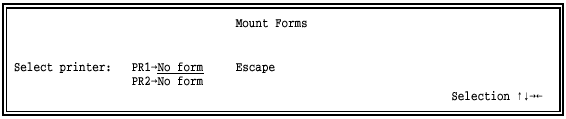
Select a printer. For example, select PR1.
A list of available forms displays:
Select a form. For example, select CHECKS.
After you make a selection, you are returned to the Mount Forms menu, which reflects the new assignment.
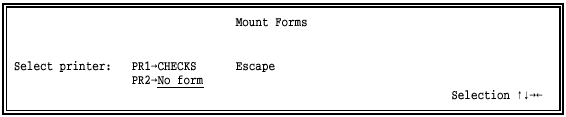
Select another printer. In this example, select PR2.
The forms list displays:

Select a form. In this example, select PERF.
After you make a selection, you are returned to the Mount Forms menu, which reflects the new assignment.
Follow the same procedure for mounting forms on any other RJE printers you enabled.
When you finish assigning forms, select Escape or press ESC to return to the Printer Forms menu.
The Printer Forms feature includes an option for automatically sending commands to the host computer when a form is mounted. These commands help control the printing of jobs that need forms. If your host computer requires form commands and you do not enter them here, you must issue commands manually from the Operation screen.
RJE systems such as MVS/JES2 associate a form name with each print output file. The RJE system also associates a form name with each RJE printer. Print files are automatically sent to the remote PC when the form name for the file matches the form name currently assigned to the remote print stream. Other selection criteria also might be required to match, such as the job class or priority.
Printer commands are used to set the criteria on the RJE print stream so that the form on the host print stream matches the form name of the jobs you want to receive.
To reach the command entry screen, from the Printer Forms
screen select Printer
Forms Commands Sent to Host.
The command entry screen displays:
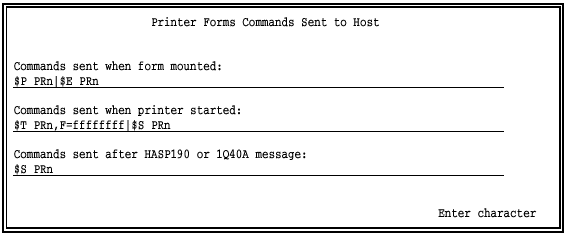
You can specify three types of command strings on this screen. The commands you enter must be in the format required by your RJE system. The default commands displayed on this screen are for JES2.
Commands sent when form mounted:
When the form is mounted with the manual Mount Forms command, the commands on the first line are sent to the host computer. Usually you enter commands on this line to drain or pause the RJE print stream. This stops file activity so additional commands can be issued.
Commands sent when printer started:
After the form is mounted with the manual Mount Forms command, the commands on the second line are sent to the host computer to start the RJE print stream. Usually you enter commands on this line to tell the host computer to release jobs that require the mounted form.
Commands sent after HASP190 or 1Q40A message:
Commands entered on the third line are sent to the host computer after BARR/RJE receives a JES2 $HASP190 message or VSE/POWER 1Q40A message. These messages are used for automatic forms mounting. The third command line lets you issue the appropriate start printer command in response to the setup message. For JES2, the start command usually is $S PRn. For VSE/POWER, the start command usually is * .. GO LST.
If you do not use the JES2 $HASP190 message or the VSE/POWER 1Q40A message, you can leave this line blank.
 You can enter only one command on this line. Unlike lines
1 and 2, line 3 does not support multiple commands separated by vertical
bars.
You can enter only one command on this line. Unlike lines
1 and 2, line 3 does not support multiple commands separated by vertical
bars.
Follow these guidelines when you enter command strings:
Substitute a lowercase n for the RJE printer number. BARR/RJE automatically replaces the n with the actual RJE printer number.
Use a series of eight lowercase fs to represent the form name. BARR/RJE automatically replaces the ffffffff string with the selected form name.
If you enter more than one command on line 1 or 2, use a vertical bar (|) to separate the commands.
You can use a ? character in the command to prompt you to enter information later. When a form is mounted, the command displays on the Command to Host entry line and you are prompted to enter the missing parameters. This is the same feature you can use for function key definitions described in section 14.4.
If you do not use forms control commands, you blank out the commands on these lines with the SPACEBAR.
The following examples show common printer commands for MVS/JES2 and MVS/JES3.
If your host system is MVS/JES2, the default commands might be sufficient. Common JES2 commands used for special forms printing are discussed at the end of this section.
The commands on this screen are outlined briefly below. See the next section, MVS/JES2 Special Forms Printing, for a detailed description of the commands.
$P PRn
Drain the printer.
$E PRn
Restart the job on the printer.
$T PRn,F=ffffffff
Set the form on the printer.
$S PRn
Start the printer.
Replace the default Printer Forms commands with the appropriate MVS/JES3 commands. Sample commands are shown below. See your IBM JES3 documentation for a description of the available commands.
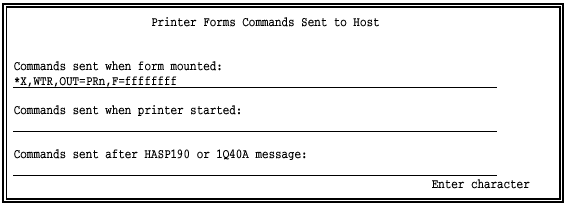
The commands on this screen are described briefly below. For a detailed explanation of JES3 commands, see your IBM JES3 documentation.
*X,WTR
Call the JES3 output service writer to drive the selected output device. Alternatively, this command might appear as *CALL,WTR.
OUT=PRn,F=ffffffff
Select the printer and set the form.
This section introduces you to the common RJE printer states for JES2 and to frequently used printer commands. This section is especially helpful to users who are new to remote printing.
At a given point in time, a JES2 printer stream might be in one of five states.
|
State |
Description |
|
Inactive |
Printer is idle. |
|
Active |
Printer is currently in use. |
|
Drained |
Printer is inactive and will not allow another print file to be printed. |
|
Draining |
Printer is active and waiting for the end of the file currently being printed before it stops. |
|
Halting |
Similar to draining. |
The following sample JES2 commands show you how to display or change the state of an RJE printer. In this example, commands are shown for PR1. These commands will work for any print stream if you substitute the corresponding RJE printer number. See Appendix A for a description of other JES2 commands.
$P PR1
The $P command sets an inactive or active RJE printer to draining. When a printer is drained, all print activity stops. If the printer is currently printing, it will continue printing to the end of the file before stopping. A printer that is drained requires a start command to become active again.
$S PR1
The $S command starts the RJE printer. If the printer was drained using a $P command, the start command enables it to become active again. A job waiting for processing will print if its form name, SYSOUT class, and other selection criteria match the criteria for the RJE printer.
$DU,PR1
The $DU command displays the status of the RJE printer and shows which form is associated with the printer.
$T PR1,F=ffffffff
The $T command sets the form name for the RJE printer. If you issue the command manually, substitute the actual form name for ffffffff. If a form name is specified for the printer, only jobs with a matching form name will print. The printer must be inactive for this command to be accepted. Use the $P command to drain the printer before issuing the $T command.
$I PR1
The $I command interrupts the job currently being printed. The $I command stops the RJE printer if the printer is in a draining state.
$DF
The $DF command displays a list of all output for the remote. You can see the job number and the form name of all output files.
$E PR1
The $E command restarts the job on the RJE printer at the beginning of the file.
$T Jnnnn,P=+1
$I PR1
The first command, $T Jnnnn,P=+1, increases the priority of job nnnn. Substitute the actual job number. The $I PR1 command interrupts the RJE printer so that job nnnn prints immediately if form name, SYSOUT class, and other selection criteria match.