Open the Configuration Utility.
Select the Override Table tab.
Under Manage override tables, click Add.
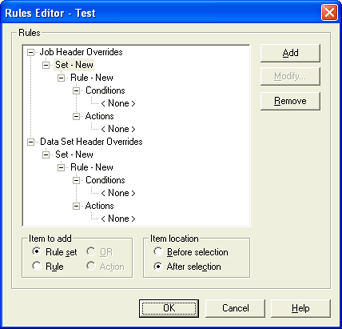
Enter a name for the override table. Click OK. The Rules Editor dialog box displays.

Override tables can be used to automatically assign header field values in spool files. As files write to the spool directory The directory where files are queued while they wait for printing or routing from the Barr print spool., entries in the override tables can automatically set or override file attributes. BARR/SPOOL updates the attribute values in the file's spool header, displays them in the Spool Window, and uses them when the files print. You can set attributes for individual files, groups of files, or all files.
The procedures below provide examples specific to sending JCL jobs to NJE or RJE-connected hosts and sending LCDS Acronym for Line Condition Data Stream. or Metacode A Xerox-generated data stream that provides all-points addressability on Xerox centralized printers. data to a Xerox DocuPrint EPS Acronym for Enterprise Printing System.. Complete the following steps to automatically populate header fields.
Open the Configuration Utility.
Select the Override Table tab.
Under Manage override tables, click Add.
Enter a name for the override table. Click OK. The Rules Editor dialog box displays.

In the Rules box, select Job Header Overrides.
Click Add.
If you want the action to apply to all jobs, leave the condition blank. If not, add a condition.
In the Rules box, under Actions select <None>.
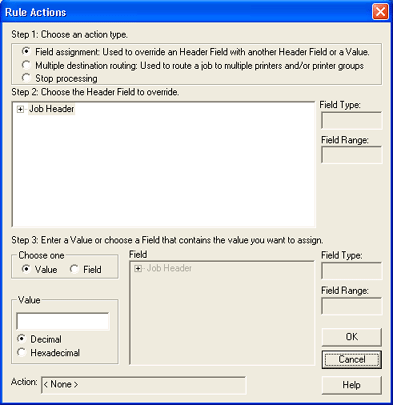
Click Modify. The Rule Action dialog box displays.

Under Step 1, click Field assignment.
Under Step 2, click the plus sign (+) next to Job Header.
BARR/NJE – Click the plus sign (+) next to General Section, and select NJHGXEQN - Execution node.
BARR/RJE and BARR/FTP – Click the plus sign (+) next to General Section, and select NJHGPRTR - Default print output destination.
Under Step 3, choose Value or Field. If you choose Value, enter the appropriate value in the Value box and select Decimal or Hexadecimal (if needed). If you choose Field, select the appropriate field from the Field box.
BARR/NJE – Select Value and enter the host node name. This must match the host node name specified in JES2 and on the NJE Configuration dialog box.
BARR/RJE – Select Value and enter RD1. This will set the job's destination device to be RD1 in the Spool Window.
BARR/FTP – Select Value and enter the connection name. The must match the connection name specified when you added an FTP connection.
Click OK.
In the Rules box, select Data Set Header Overrides.
Click Add.
If you want the action to apply to all jobs, leave the condition blank. If not, add a condition.
In the Rules box, under Actions select <None>.
Click Modify. The Rule Action dialog box displays.

Under Step 1, click Field assignment.
Under Step 2, click the plus sign (+) next to Data Set Header.
BARR/NJE – Click the plus sign (+) next to Internal Custom Section, and select NDHBNODE - Routing node.
BARR/PRINT to EPS – Click the plus sign (+) next to General Section, and select NDHGRMT - Destination Device.
Under Step 3, choose Value or Field. If you choose Value, enter the appropriate value in the Value box and select Decimal or Hexadecimal (if needed). If you choose Field, select the appropriate field from the Field box.
BARR/NJE – Select Field. Click the plus sign (+) next to Data Set Header and then the General Section. Select NDHGNODE - Destination node.
BARR/PRINT to EPS – Select Value and enter the queue name defined on the Xerox DocuPrint EPS.
Click OK twice to return to the Override Table tab.
Under Active override table, select the override table you just created.
Stop and restart the BARR SpoolCore service so changes will take effect.