Open the Configuration Utility.
From the Override Table tab, click Add.
Enter a name for the override table and click OK. The Rules Editor dialog box displays.
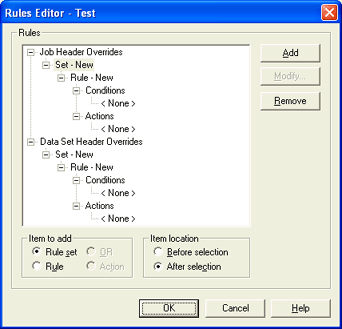
Override tables automatically set file attributes for spool files and are useful for unattended print spool operation. As files write to the spool directory The directory where files are queued while they wait for printing or routing from the Barr print spool., entries in the override tables can automatically set or override file attributes. BARR/SPOOL updates the attribute values in the file's spool header, displays them in the Spool Window, and uses them when the files print. You can set attributes for individual files, groups of files, or all files.
To perform these tasks, you must have the appropriate user access rights.
Complete the following steps to create an override table.
Open the Configuration Utility.
From the Override Table tab, click Add.
Enter a name for the override table and click OK. The Rules Editor dialog box displays.

In the Rules box, select the type of override table you want to create, Job Header Overrides or Data Set Header Overrides.
Click Add.
You can create additional rule sets by completing the following steps. (optional)
Select any Set - New statement. You can rename the rule set by clicking the label after it has been selected. The new name will appear after the word "Set".
Under Item to add, select Rule set.
Under Item location, select Before selection or After selection to specify placement of the new rule set.
Click Add.
If you want the action to apply to all jobs, leave the condition blank and skip the following steps. Refer to the Instructions box at the bottom of the Rule Conditions dialog box for further explanation.
In the Rules box under Conditions, select <None>, and then click Modify. The Rule Conditions dialog box displays.
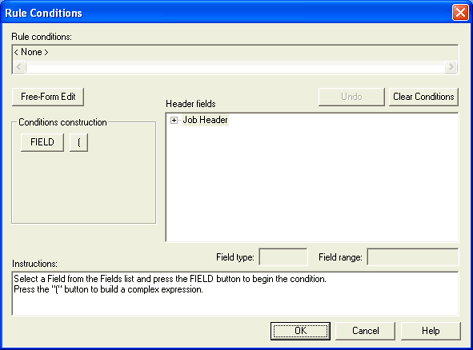
In the Header fields box, click the plus sign (+) next to Job Header or Data Set Header.
Click the plus sign (+) next to the appropriate section and select a field from the list.
Under Conditions construction, select FIELD.
Select an operand (=, !, <, >).
Select a field or value to complete the expression. Select FIELD or VALUE as appropriate. Complex expressions can include an AND or OR condition. Remember to use parentheses to separate statements. For example, (Field operand Value) OR (Field operand Value).
You can specify a value that includes an asterisk (*) to match any alphanumeric characters (including spaces), a number key (#) to match any alphanumeric characters (excluding spaces), or a question mark (?) to match a single character. To use an asterisk, number key, or question mark as a literal character, you must place a backslash (\) before the symbol. For example, to match "test*", the value should be "test\*".
Click OK to return to the Rules Editor dialog box.
Override tables must contain at least one action statement.
In the Rules box under Actions, select <None>.
Click Modify. The Rule Actions dialog box displays.
Choose the action type you want to create, Field assignment (used to override a header field with another header field or value), Multiple destination routing (used to route a job to multiple printers and/or printer groups), or Stop processing (used to stop processing the override table).
If you want to override or set a file attribute by assigning a field value, complete the following steps.
Click the plus sign (+) next to Job Header or Data Set Header.
Click the plus sign (+) next to the appropriate section and select the field to override with an action.
Under Choose One, select Value or Field to specify the type of entry.
If you select Value, enter a value in the text box and select Decimal or Hexadecimal.
If you select Field, select the field to assign to the overridden field in the Field box. You cannot override a job header field with a data set header field.
Click OK.
If you want to override or set a file attribute by routing to multiple printer destinations, complete the following steps.
In the Printer Groups and Printers lists, select the printer groups and/or printers where you would like to print. Printers are defined from the Configuration Utility's Spool Printers tab. Printer groups are defined from the Configuration Utility's Printer Groups tab.
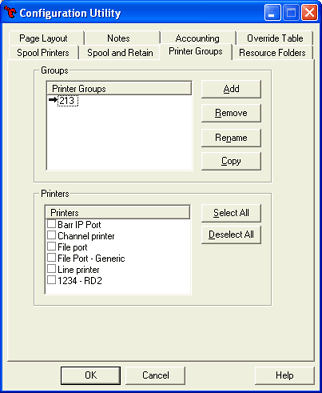
If you choose Route jobs to Any destinations selected above, you can only select one printer group. Individual printers cannot be selected. If you choose Route jobs to All destinations selected above, you can select any combination of printer groups and/or individual printers.
Select to Route jobs to All destinations selected above or Route jobs to Any of the destinations selected above.
Click OK.
Select any Rule - New statement. You can rename the rule by clicking the label after it has been selected. The new name will appear after the word "Rule."
Under Item location, select to add the rule before or after the selected rule.
Click Add.
Refer to the steps above to add conditions and actions to the new rules.
In the rule set you want to contain an OR statement, select the Rule - New statement.
Select OR.
Select Before selection or After selection to specify placement of the new item.
Click Add.
Click OK to exit the Rules Editor dialog box.
Activate the override table.
Select the Configuration Utility's Override Table tab.
Under Active override table, select an override table.
Stop and restart the BARR SpoolCore service so changes will take effect.
Open the Configuration Utility.
Select the Override Table tab.
In the Manage override tables list, select the override table you want to modify.
Click Modify. The Rules Editor dialog box displays.
Modify the override table by adding, modifying, or removing items from the override table.
Open the Configuration Utility.
Select the Override Table tab.
In the Manage override tables list, select the override table you want to remove.
Click Remove.
A dialog displays asking you to confirm the deletion. Click Yes to delete or No to cancel the deletion.
Complete the following steps to import an override table.
To import DOS FATs Acronym for File Attribute Table. A collection of rules that define conditions and actions designed to modify header fields as jobs are being received into the Barr spooler., you must first convert the files using the DOS FAT Conversion utility.
Open the Configuration Utility.
From the Override Table tab, click Import. The Import Override Table Files dialog box displays.
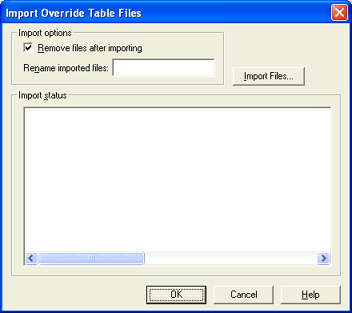
Set the Import options.
If desired, select Remove files after importing. This will remove the files from the source directory.
By default, the imported file names will be used as the override table rule set names. You can specify different rule set names by entering a name in the Rename imported files box. If you import multiple files, an incremental number will be added to the end of each name.
Click Import Files. The Open dialog box displays.
Select the files to import and click Open. The Import status box displays the import results.
Click OK to exit the dialog. The imported files will appear in the override table directory and can be selected or modified from the Configuration Utility's Override Table tab.
Complete the following steps to merge several override tables into a new override table.
Open the Configuration Utility.
From the Override Table tab, click Merge. The Merge Override Table Files dialog box displays.
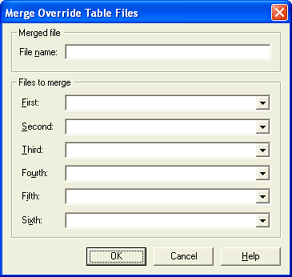
Under Merged file, specify a File name for the new override table to be created.
Under Files to merge, select up to six override table files to merge. Select the files using the First, Second, Third, Fourth, Fifth, and Sixth drop-down lists. When the files are merged, the override table rules in the First file will precede those in the Second file and so forth.
Click OK to create the merged override table. The merged file will appear in the override table directory and can be selected or modified from the Configuration Utility's Override Table tab.
Review and, if necessary, modify the merged override table to ensure the logic is correct.
Complete the following steps to create an override table that will route all jobs or selected jobs to a printer group. For more information about printer groups, see the Working with printer groups topic.
Open the Configuration Utility.
From the Override Table tab, click Add.
Enter a name for the override table and click OK. The Rules Editor dialog box displays.

In the Rules box, select the type of override table you want to create, Job Header Overrides or Data Set Header Overrides.
Click Add.
If you want all jobs to route to the printer group, in the Rules box, leave the condition set to <None>.
Under Actions, select <None>.
Click Modify. The Rule Actions dialog box displays.
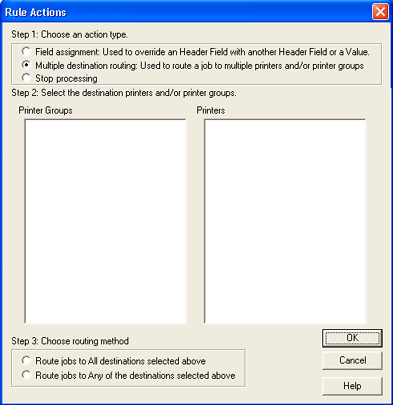
Select Multiple destination routing to route a job to multiple printers and/or printer groups.
In the Printer Groups and Printers lists, select the printer groups and/or printers where you would like to print. Printers are defined from the Configuration Utility's Spool Printers tab. Printer groups are defined from the Configuration Utility's Printer Groups tab.
If you choose to Route jobs to Any destinations selected above, you can only select one printer group. Individual printers cannot be selected. If you choose to Route jobs to All destinations selected above you can select any combination of printer groups and/or individual printers.
Select to Route jobs to All destinations selected above or Route jobs to Any of the destinations selected above, and then click OK.
You can specify document attributes, that are printer specific, for an original document or its copy when routing to multiple destinations. Complete the following steps to specify document attributes for each printer.
In the Rules box, select Data Set Header Overrides.
Click Add.
Under Conditions, select <None>.
Click Modify. The Rule Conditions dialog box displays.

In the Header fields box, click the plus sign (+) next to Data Set Header.
Click the plus sign (+) next to Internal Custom Section, select NDHBPDST - Printer Dest.
Under Conditions construction, click FIELD, and then click the equal sign (=).
Under Conditions construction, type the printer name and click Value.
Click OK. You can add an action for the specified printer or printer group.
Click OK twice to return to the Override table tab.
To activate the override table, under Active override table, select the override table.
Click OK to exit the Configuration Utility. For your changes to take effect, you must restart the BARR SpoolCore service. You can do this by clicking Yes when prompted, or by manually stopping and restarting the service.
Many different combinations of override table rules and conditions can be created to control print jobs. An example of a simple override table override is to set a condition of documents with a job priority of 1 in the header field. In the following example, when this condition occurs, three copies of the documents will be sent to the specified printers. This section will step you through the process of creating this override table example.
To create a new override table, you must first name the override table and determine the override.
Open the Configuration Utility.
From the Override Table tab, click Add to create a new override table.
Enter a name for your override table in the New Override Table dialog box.
Click OK. The Rules Editor dialog box displays.
In the Rules box, select Job Header Overrides and click Add.
Next, create a condition statement.
(Check for Priority = 1 in the Job Header)
To check for a job priority = 1 in the header, you must create the condition: NJHGPRIO=1. Field code descriptions are listed next to the codes to help you choose a field.
From the Rules Editor dialog box, under Conditions select <None>.
Click Modify to open the Rule Conditions dialog box.

In the Header fields box, click the plus sign (+) next to Job Header to expand the list.
Click the plus sign (+) next to General Section. Scroll down and select the NJHGPRIO - Job priority field.
Under Conditions construction, click FIELD to add Job Priority to the Rule Conditions text box.
Click = to add the operand.
In the Conditions construction box, enter 1.
Click VALUE to add 1 to the Rule Conditions text box.
Click OK to add the condition (NJHGPRIO=1) to the rule and return to the Rules Editor dialog box.
Next, create an action.
To assign an action to the condition, complete the following steps.
In the Rules box, under Actions select <None>.
Click Modify. The Rule Actions dialog box displays.
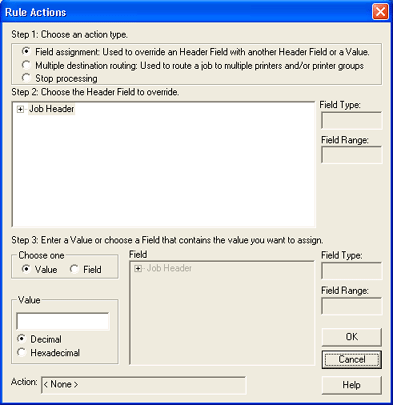
Select Field Assignment (used to override a header field with another header field or value).
In the Step 2: Choose the Header Field to override box, click the plus sign (+) next to Job Header to expand the list.
Click the plus sign (+) next to General Section. Scroll down and select the NJHGJCPY - Number of output copies field.
Under Choose one, select Value.
In the Value box, enter 3. Click OK.
In the Rules box, select the action we just created (NJHGJCPY=3).
Click Add to create an additional action.
Click Modify to change the empty action.
Select Multiple destination routing (Used to route a job to multiple printers and/or printer groups).
Select several of the printers listed in the Printers list.
Select Route jobs to All destinations selected above. Click OK.
Click OK to close the Rules Editor dialog box.
Next, let's use the override table.
Although you have just created an override table, it is not active until it has been selected.
From the Active override table list, select your new override table.
Click OK.
Stop and restart the BARR SpoolCore service so changes will take effect.